Using locales
Kanzi uses locale as an ID to select the resources associated with a language and location. If you do not define the resources for a locale, Kanzi uses the resources set in the default locale.
Learn how to localize your Kanzi applications by completing a tutorial. See Tutorial: Localize your application.
Setting the application locale
Use the Locale property in the Screen node to set which locale your application uses.
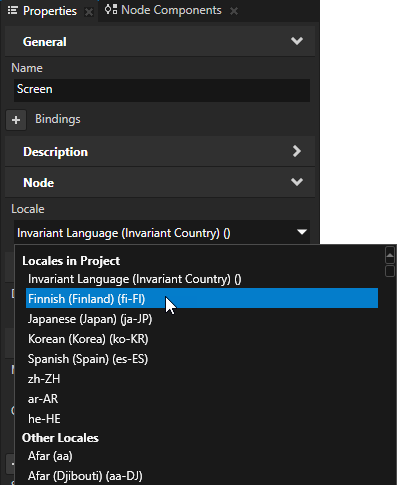
For example:
- To use a specific locale in the Kanzi Studio Preview, in the Project select the Screen node and in the Properties set the Locale property to the locale you want to use.
- To set the default locale your application uses when a user launches it, make sure that the Locale property is set to that locale after saving the Kanzi Studio project and exporting the kzb file from the project.
- To set a locale using a control, use any trigger and the Set Property action to set the value of the Locale property in the Screen node.
- To find out when locale in your application changed, use the On Property Change trigger and in the Trigger Settings set.
Creating locale packs
A locale pack is a kzb file that contains only the resources for a specific locale. Using Kanzi Engine API you can load the application resources used by a certain locale when you set that locale. That way you reduce the size of kzb files in your application.
When you want to export a resource that is used by a locale pack to the main project kzb file, in the Library select the resource and in the Properties add and enable the Is Used By Code property. All resources that have Is Used By Code property enabled are exported only to the main project kzb file and not to any locale packs that use them.
To create a locale pack:
- In the Library > Localization add to the localization tables the resources used by the locale you want to add to your Kanzi application in a locale pack.
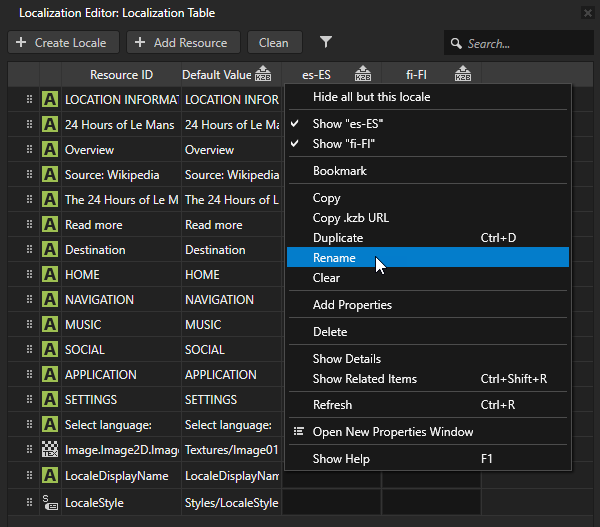
- In the Library > Localization double-click any localization table and in the Localization Editor click
 next to the locale name the resources of which you want to export to a locale pack.

-
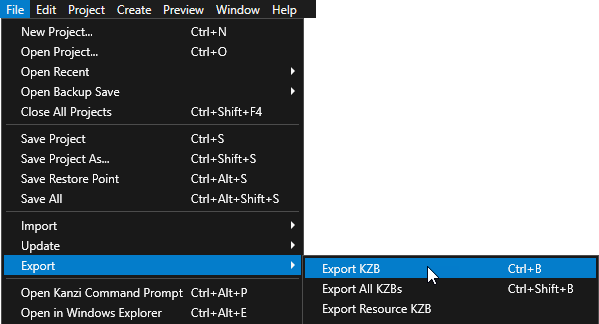
In Kanzi Studio select > Export > Export KZB. This command:
- Creates one kzb file for each locale you marked in the localization table as a locale pack. When Kanzi Studio exports locale packs it names the kzb files after the locale the resources of which they contain. Each locale pack file contains only the resources used by that locale.
- Creates the main kzb file that contains the entire Kanzi Studio project, except the resources of locales you mark as locale packs in the localization table.
- Stores the locale pack kzb files in the <ProjectName>/Application/bin/Locale_packs, or the Locale_packs directory in the location you specify in the Binary Export Directory property in the > .
- Use the Kanzi Engine API to load the locale pack in your Kanzi application. See Tutorial: Localize your application.
Adding a locale manually
Kanzi uses locale as an ID to select the resources associated with a language and location. If you do not define the resources for a locale, Kanzi uses the resources set in the default locale.
When you import a .po file, Kanzi automatically adds a locale set in that .po file, if the locale with the same name does not already exist.
To add a locale manually:
- In the Library > Localization double-click any localization table.
Kanzi Studio opens the localization table in the Localization Editor.
- In the Localization Editor click + Create Locale, enter the name for the locale, and click OK.
Kanzi Studio adds the locale to all localization tables in your project.
Changing the name of an existing locale
To change the name of an existing locale:
- In the Library > Localization double-click any localization table to open it in the Localization Editor.
- In the Localization Editor right-click the header of the locale you want to rename and select Rename.
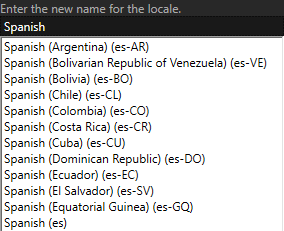
- Enter the new name for the locale and click OK.
See also
Localizing applications
Tutorial: Localize your application
Localization

Open topic with navigation